There are IT companies that hire people who solely set up and take care of the infrastructure of projects. The main aim of their work is to configure environments on which systems are developed.
However, now thanks to frameworks such as AWS CDK, developers can write code that will create and configure all environments on which later systems will work. Every single change is saved in the repo history and is reviewed by the rest of the team.
Code that generates a template of CloudFormation can be written in several programming languages. Whole infrastructure can be easily set up and as well erased by a few commands from the terminal. It’s worth mentioning that the code can be written in various programming languages such as Python, TypeScript, JavaScript, C#, Java, and soon Go.
I would like to share my insight on using the above-mentioned framework as I have been using it for a couple of months during working on the Data Lake project. The Data Lake can be defined as a repository where the data can be stored in a raw and chosen format.
Why AWS CDK?
At first, AWS CDK seemed to be a very well-documented framework with various examples. Compared to Terraform, AWS CDK wouldn’t store statutes of deployments. Besides that, in the case of Terraforma, the template creation was only possible by HashiCorp Configuration Language (HCL), which we thought would be difficult to model in our complex project.
Below you can see a code example in which I created a role and provided it with permission to read data from a bucket. From my perspective, the code seems to be quite transparent and thanks to using the “CDK synth” I was able to create a template for CloudFormation and see what the code generated.
The code of AWS CDK
from aws_cdk import aws_iam, aws_s3, core

class MyStack(core.Stack):
   def __init__(
       self,
       scope=None,
       id=None,
       **kwargs
   ):
       super().__init__(scope=scope, id=id, **kwargs)

       bucket_arn = "arn:aws:s3:::fooo"
       user_arn = "arn:aws:iam::123456789:user/MyUser"
       role = aws_iam.Role(
           self,
           "newRole",
           role_name="newRole",
           assumed_by=aws_iam.ArnPrincipal(user_arn)
       )

       foo_bucket_policy = aws_iam.Policy(
           self,
           "PolicyName",
           statements=[
                        aws_iam.PolicyStatement(
                            actions=[
                                "s3:GetObject*",
                                "s3:GetBucket*",
                                "s3:List*"
                            ],
                            effect=aws_iam.Effect.ALLOW,
                            resources=[
                                bucket_arn,
                                f"{bucket_arn}/*"
                            ],
                        ),
                    ],
       )
       role.attach_inline_policy(foo_bucket_policy)
Here is a generated scheme of CloudFormation
Resources:
  newRole3F295E4D:
    Type: AWS::IAM::Role
    Properties:
      AssumeRolePolicyDocument:
        Statement:
          - Action: sts:AssumeRole
            Effect: Allow
            Principal:
              AWS: arn:aws:iam::123456789:user/MyUser
        Version: "2012-10-17"
      RoleName: newRole
    Metadata:
      aws:cdk:path: my-stack/newRole/Resource
  PolicyName2EBC7934:
    Type: AWS::IAM::Policy
    Properties:
      PolicyDocument:
        Statement:
          - Action:
              - s3:GetObject*
              - s3:GetBucket*
              - s3:List*
            Effect: Allow
            Resource:
              - arn:aws:s3:::fooo
              - arn:aws:s3:::fooo/*
        Version: "2012-10-17"
      PolicyName: PolicyName2EBC7934
      Roles:
        - Ref: newRole3F295E4D
    Metadata:
      aws:cdk:path: my-stack/PolicyName/Resource
Once we have the infrastructure code and environment of our account configured by the “CDK deploy” command, the CloudFormation could be successfully formed.
The Stack allows separating resources in the AWS according to your needs. The code example shows an example of passing along resources between stackies.
The “MainStack” is passing over a role to “ETLStack”. The role is transmitted from “MainStack” to “ETLStack”. In the case of such an operation, it’s important to note which stack should be generated first. Therefore, I added the parameter depends_on_stacks to determine which stack should be handled.
app = core.App()
main_stack = DataLakeSetupStack(
   app,
   f"{PREFIX}-main",
   env={"region": AWS_REGION},
)
ETLStack(
   app,
   f"{PREFIX}-etl",
   stack_name=f"{PREFIX}-etl",
   env={"region": AWS_REGION},
   depends_on_stacks=[main_stack],
   role=main_stack.datalake_role
)
app.synth()
A role export occurred in the main stack file which I further used in the ETL stack code.
"Export": {
 "Name": "DL-FOO:ExportsOutputRefroleC7B7E775984233C4"
}
This is how the import command looks like in the second stack.
"Roles": [
         {
           "Fn::ImportValue": "DL-main:ExportsOutputRefroleC7B7E775984233C4"
         }
       ]
Passing the parameter to the constructor doesn’t mean exporting the resource, it must be used in a given stack.
How did we use the AWS CDK?
Our team consists mainly of Python developers, so the choice of the programming language was immediately obvious for this project. At the beginning, we splitted the code according to the modules used, e.g. concerning permission and creating jobs to process the data.
With the further development of the project, we took advantage of the ability to separate the code into stacks. The most logical from our point of view was to divide code into stackies per source of external data, meaning each source had a seperate:
- Workflow ( steps of executing periodically or request to process the data)
- Jobs (scripts processing data to the given format)
- Buckets (folders with data)
- Glue tables (metadata allowing to request buckets with SQL)
Besides, we needed a main stack to configure Virtual Private Cloud (VPC) with the rest of the stacks. In addition, we had to separate a stack with monitoring, where we kept configured metrics for Cloudwatch (a repository of metrics for various services). Over time, there was also a need to create a role stack that would be used for backward compatibility.
We were receiving data from the appropriate buckets through the role which we shared with the client. The client gave these roles pull data permissions. Once we accidently deleted roles which made them lose their permissions. For example, when we were reorganizing the code in the stacks, the role was removed and recreated.
That is the main reason we created a single roles stack that could be used by all branches and stackies. There isn’t much going on there, so it’s easier for us to make sure that roles don’t recreate when the code changes.
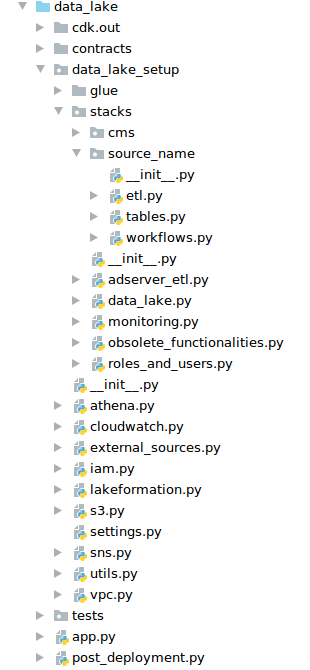
Below there is a print-screen of our project, but to not reveal too much, I deleted the folders with the names of the data sources and gave “source_name” for example. I did not include Docker and configuration files for code quality control in this structure in order to focus only on the discussed library. It is worth noting that we used mypy, flake, isort, and black in our project.
By dividing the code into stacks, it was easier to work as we didn’t have to rebuild the entire project because of adding a new role.
It is worth mentioning that we used the GitOps methodology, so each developer was able to work by setting up their own infrastructure. There were branches that had the privilege to download data that we called data-access or master.
When someone needed to check integration with the external resource then the person could use the branch data-access. The master also required possessing the privilege to access the data as it was our production environment.
Of course, as every self-respecting developer, we wrote tests. They were examining the CloudFormation templates. Thanks to that we were sure that the right resources were created within the right stacks.
What problems did we encounter?
- There is insufficient number of features in the Glue tables, so we had to set up a different library after the deployment of CloudFormation. We used a script in Boto3 (the library to communicate with AWS with the use of API).
- There are some cases that cannot be set up through AWS CDK and some parameters had to be managed manually with the override method to create the type of template required by CloudFormation.
- When resources are created by overwriting templates, they can be created in the wrong order (e.g. deployment will first want to grant permissions and then create a resource to which the access should be granted.)
- In our approach each branch had its own infrastructure so we had to watch out that the resources have unique names. If some resource on the AWS account had already been given a name we were trying to add, then the deployment was rejecting the source with an error and wasn’t further creating resources.
- With the work of many developers and many deployments of our infrastructure, we have encountered AWS limitations more than once. Fortunately, most of the time, it is enough through the panel to ask for an increase in the limitations and wait for the approval. Unfortunately, sometimes you needed to justify our request and it was taking some time, so the deployment of new resources was blocked then.
- We created a role for our client through which the client was pushing files. However, once on the master branch, the role was accidentally removed and then recreated which made it lose the privilege that the client had been given.
- Relocation of a given resource to another stack triggers its removal (therefore we decided to create a separate stack for each role).
- When someone did some manual changes, the deployment branch can be broken, e.g. adding admin to the Data Lake which is deleted later by deleting the stack may cause some errors in different deployments (the admin physically doesn’t exist but it is included in the admin list).
- We had to create a script to remove the branch deployments at night, due to the enormity of resources we created, as not each programmer remembered to clean up after himself.
- Little or no documentation for some parts, such as e.g. how to set up the Neptune database. The JavaScript part of the AWS CDK is much better documented, and we sometimes took some inspiration from it rather than Python to figure out how to write something.
- For many people in the team, it was the first time to use AWS resources, so we had to understand that the permissions are needed everywhere because errors/issues that occurred during the environment setup were not always so obvious. Over time, we knew that we needed to check the permissions if something didn’t work.
- With our approach, everyone could create their own infrastructure and not worry about the compatibility, because its deployment was often removed and re-created. However, when merging with the master branch which was working all the time, we had to keep in mind that something could fall apart.
Summary
The AWS CDK library is trivial to create simple stuff. However, as a programmer delves into its depths, the person begins to see gaps in their knowledge.
Clicking something in the AWS console seems trivial, but when it is to create the code that creates a given functionality, stairs appear. You need to know how something works to know what components it requires in order to write it. It is definitely a great opportunity to expand knowledge.
A great introductory tutorial shows the advantages of this library. Unfortunately, there are still resources that cannot be created with all the parameters. The library is growing very fast and we update it frequently in our project. So we hope that it will be without ‘holes’ in time.
The simplicity of setting up and changing infrastructure should certainly encourage anyone who has an infrastructure based on AWS services. We have been using the AWS cloud for many years, we are even its partners, which is why this direction was natural for us.